Saturday, April 21, 2012

Advanced Photoshop HW #12


I made this Acoma pot by creating a pen shape of a cross section of the shape I wanted for the pot and then bending the extrusion 360°.  I then applied the balsa wood texture to the side material.  After applying the repoussé I used the 3D tools to edit the texture to change the color and add the pattern.

 
An Isoline drawing

Thursday, April 19, 2012

Advanced Photoshop HW #11 - HDR and HDR Toning

 Using the HDR method really boosted the amount of detail on this bleeding heart blossom.  I was able to bring out the fine detail of the texture of blossom.


 I love the amount of detail, the textures that I can reveal that were lost in the individual images.

 This above image is playing with the surrealistic effects that can be applied to the image.
The image to the right is mid exposure original image for the two previous images.


The image I took years ago (as shown on the right) using the faux HDR Toning adjustment to create the HDR style image above.

Monday, April 16, 2012

Advanced Illustrator HW #10 - My Dinner with...

References
Terry Pratchett is one of my favorite authors and his Discworld series is absolutely fantastic.  The setting and other elements for this composition comes straight from his books, from the half-timber buildings and Librarian turned ape to the foods on the menu and the pet swamp dragon Errol.  I even created the type for the "My dinner with..." text (with the pen tool) to be reminiscent of the type used on the covers of many of Terry's books.
I was initially going to set the background to an interior bar-room scene and then I found images of these amazing half-timber models which suited the image in my head.  The hardest part of this composition was manipulating the cobbled street to match the half-timber models in the background.  I did this by starting with a repeatable cobble pattern that I used along the bottom of the image, which I then used the puppet warp tool to warp the cobbles to follow the line of the buildings.

Tuesday, April 10, 2012

Advanced Photoshop HW #9

I used the luminance blending tool to add a layer of clouds from a different image (below) in front of this image I took of Mount Hood.

Using the actions tool helps me to automate certain aspects such as resizing, watermarking and renaming of images.  A process that used to take me hours now can be done in a lot less time and can be done with limited user input.  Larger batches can be done in the background while I work on other projects.  However there are still aspects of the image manipulation process that still requires individual attention particularly the basic photo manipulations, such as levels, which I do for almost all of my photographs.


I used the batch method to apply the re-size  action for this and a few other images and used the droplet tool to apply the watermark.

Sunday, April 1, 2012

Advanced Photoshop Midterm - Graffiti SelfPotrait

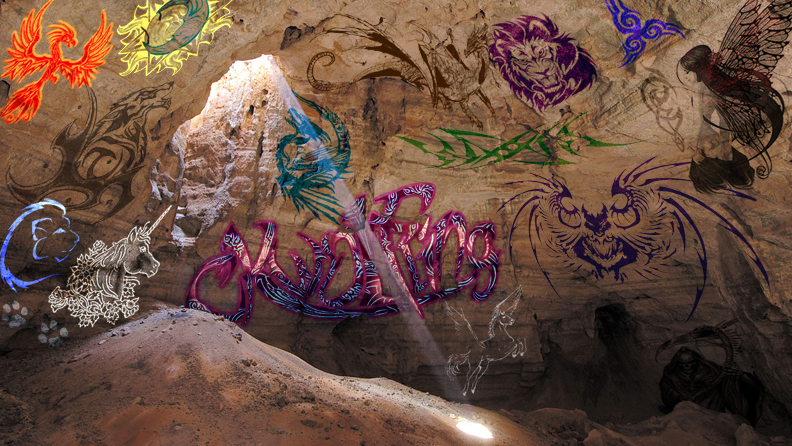
Backgound image: cave
I am not fond of graffiti art in general so I tied to find a style that suited me, which I found in the form of a tribal/tattoo brush pack that I downloaded from Brusheezy.  I also prefer natural settings, which is why I chose to decorate this cave wall.  I heavily used the perspective transform tool  to get the patterns to follow the contours of the walls and I used a variety of blend modes to insure the texture of the wall remained visible.  I used masks to "erase" where bits of wall had fallen, where some of the patterns overlay each other and to change the color of the moon in the sun and moon pattern.

I looked at many of the "graffiti" fonts at dafont but none suited me, so I looked for "tribal" fonts instead and found this font (tribal 2) which suited my personal style.  For the name mark I used the pen tool heavily to alter the letterforms as you can see in the comparison with the original letterforms.  I wanted to make the letters distinct enough to be recognizable with minimal overlap, which made the "o" the hardest of the letters to alter.